How to Do Concrete
Site Planning & Preparation – Layout – Forming
(Part 1 of 4)
For those that like to do the work themselves, we have developed this Do-It-Yourself guide to concrete. This section contains a list of concrete definitions, and tips straight from the Pro’s that have been Finishing Concrete for years.
Concrete finishing is part science, part art. Professional concrete finishers possess skills they have perfected over years of hands on experience. We have tried to include enough information so that you will have a good understanding of the entire process from Layout to Curing.
Site Planning & Preparation
Before you begin your project, it is important to properly plan and prepare. Proper planning will save time, money, and helps to assure your satisfaction with the final product.
Elevation/Drainage
The industry standard calls for a slope of ¼ inch per foot away from structures. Some projects like garage slabs may be able to use an ⅛ inch slope. The main slab of a house will have elevation requirements: however, no drainage considerations except for garage, patios, and porches which should obviously slope away from the structure. In some instances, like in the case of a pool deck, the slab may slope toward the structure, however drains are strategically placed to move this water away from the building.
Thickness
For common household projects – driveways, walkways and patios – 4 inches thick should do be adequate. Thicker concrete (i.e. 6″ is recommended for heavy duty use or heavy vehicles).
Excavation and/or Adding Compacted Base Material

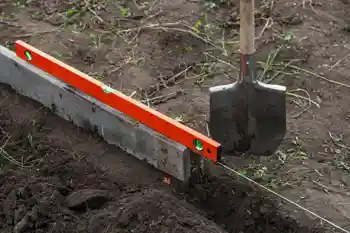
Once you know the elevation of your slab, and the desired thickness, you will be able to determine if any excavation is required. Place Grade stakes at the desired level of the top of the slab, draw a string line between the stakes. Measure between the string and the ground, or use a small piece of lumber cut to the desired height to see if you need to excavated or add base material.
Placing of the grade stake is critical. For precise measuring use a builders level, laser level, or water level if the slope is not that critical you can use a 4’ bubble level.
When excavating take care to only dig as deep as necessary to ensure you remove tree roots, leaves, wood and any other organic matter in the project area. Organic material will decompose over time leaving voids under the slab. It is recommended to use a ¾ minus crushed gravel for the compacted base. You can rent a compactor from most rental equipment stores.
Note: Never bury construction debris under the slab. Keep an eye out for power lines; if you are unsure where lines are, call your utilities for a locator.
Compact the Subgrade Thoroughly

Most Concrete slabs are designed to have a compressive strength of 3000 psi. Concrete flexural strength is the ability of a slab, wall or beam of concrete to resist failure under pressure to bend. Typically slabs are not designed with the extra reinforcing it would take to achieve a high flexural strength. That is why slabs will crack when the sub grade settles and fails to provide uniform support. Uniform compaction is critical to ensure that settling cracks are minimized.
After correct compaction of your sub-grade is achieved do not let the concrete truck drive onto the area being poured. Most Mixer trucks fully loaded weighs approximately 80,000 lb; this will turn a uniform compacted subgrade into a non-uniform compacted subgrade real fast. I have seen pictures of a 200 foot sidewalk crack right down the middle for 200 feet because the concrete driver rolled and poured with one set of tires inside the concrete form.
Manual or mechanical compactors can be rented from most rental supply stores.
PVC Pass Through

A 2”- 6” Diameter Piece of PVC strategically located prior to the pour under a Sidewalks or Driveway slab will allow for new Sprinkler Lines, Cables, Low voltage lighting wire, etc. in the future. Advanced planning can save you a lot of work in the future.
Consider Electric and Plumbing Utilities
If there is any plumbing involved with the slab, consider it in the concrete slab design. The same goes for any electrical conduit supplied to the slab. Failure to prepare for utilities means the concrete slab will need to be trenched and patched later. Make sure to glue all joints, to ensure that plumbing pipes or electrical conduit doesn’t get dislodged during the pour.
(If you never get ask this question, you have done well – Question “You just poured that why are you digging it back up?)
Termite Treatment & Vapor Barriers
In most counties in Florida, interior slabs are required to have the soil treated for termites. Interior slabs must also have a vapor barrier of at least 6 mil poly sheeting placed on top of the compacted base material or soil.
Forming & String Lines
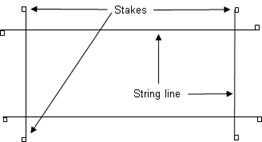
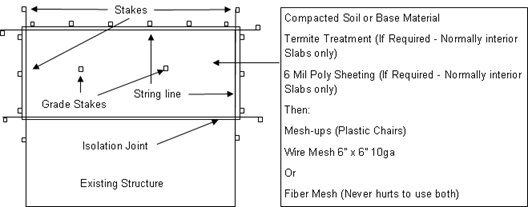
For Square/Rectangle Slabs – Drive stakes at the corners past the edge of the desired slab and connect the stakes with string. The string should run along the outer edge of the slab crossing one another at the corners with the stake out farther than the slab edge. String line should be tight so it does not droop in the middle.
Placing Your String Lines
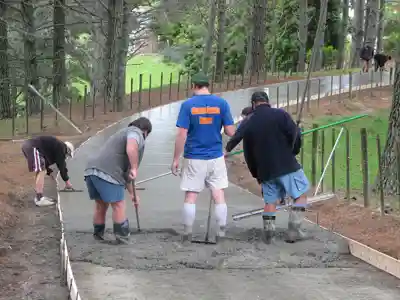
Forming
Take care to stake your forms securely to the ground, while paying close attention to the slope (for proper drainage in all directions). 2” x 4”s are perfectly adequate for use as forms, though make sure you have the desired thickness (usually 4″) available at the edges. The string line ensures the form is square. The stakes should be placed every 24 inches and should be driven slightly below the level of the form board. (Note: you will be using the side forms to rest the strike-off board on. Proper strike-off requires a flat surface from one end of the form to the other. If you leave the stakes above the board you will fight them the whole way down.)
It’s important to keep the slab level in all directions. Adjust the sides of the form to get this right. Nail the stakes to the sides of the form securely. (Note: Using a double headed nail or leaving the nail head slightly out of the form will make it easier to remove them later.)
Back filling behind the form will help give the form more stability.
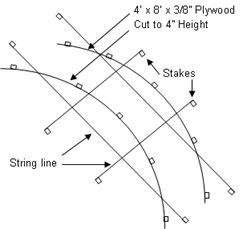
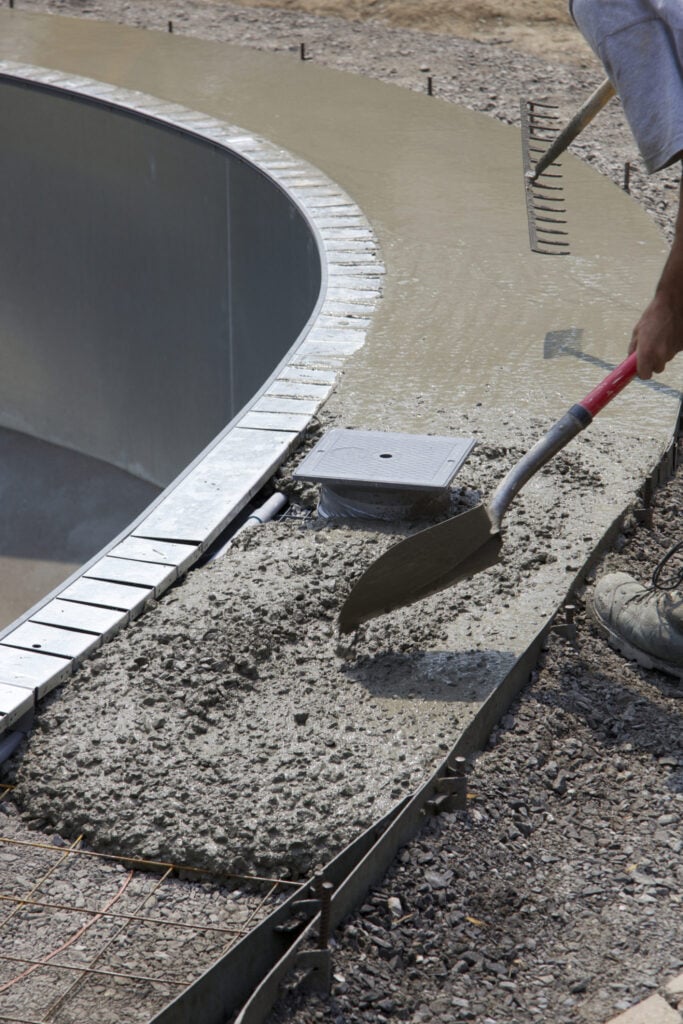
Forming Curves
Forming curves in Sidewalks and Driveways is a great way to change a plane straight sidewalk into a meandering path or Driveway. Forming curves is fairly simple to do. First go to your favorite lumber supplier and have them cut a 4” x 8’ x 3/8” sheet of plywood into 4” forming strips. Start in the middle drive in a stake then work your way to the end of that form board.